Welcome to your comprehensive guide on how to build a deck in New Zealand, designed to help you transform your outdoor space into the perfect spot for relaxation and entertainment. Whether you’re an experienced DIY enthusiast or tackling this kind of project for the first time, building a deck is a rewarding way to enhance your home’s value and lifestyle. In this guide, we’ll walk you through the entire process, from planning and design to construction and finishing touches, with special attention to NZ-specific regulations and materials. By the end, you’ll have all the knowledge you need to build a beautiful, durable deck that complements your home and withstands New Zealand’s unique climate. Let’s get started!
To build a deck in New Zealand, start by planning your deck’s location, size, and purpose. Choose durable materials like pine or hardwood that suit NZ’s climate, and ensure your design meets local building codes. Obtain necessary consents for decks higher than 1.5 meters. Prepare the site, install posts securely, attach bearers and joists, and lay decking boards with proper spacing for drainage. Finish with railings, stairs, and sealing to protect the wood. Regular maintenance, such as cleaning and staining, will help extend your deck’s lifespan in NZ’s outdoor conditions.
Table of Contents
Planning Your Deck
Building a deck can transform your outdoor space into a functional and aesthetically pleasing area. Whether you’re looking to entertain guests, create a relaxing spot for yourself, or add value to your home, careful planning is essential. Let’s dive into the key aspects you need to consider when planning your deck to ensure a successful project.
Choosing the Right Location
The location of your deck is one of the most crucial decisions you’ll make. When selecting the ideal spot, consider factors such as:
- Sun Exposure: Think about how much sunlight the deck will receive throughout the day. If you prefer a shaded area, you might want to build near trees or add a pergola. On the other hand, if you’re after sunlight for an early morning coffee or evening relaxation, position the deck to face the sun.
- View: A great view can enhance the overall enjoyment of your deck. Whether it’s a scenic landscape, garden, or backyard, make sure the deck’s orientation captures the best possible sights.
- Access From the House: Ideally, your deck should be easily accessible from the house, particularly from areas like the kitchen or living room. This makes outdoor dining and entertaining more convenient, as it minimizes the distance you’ll need to carry food and other items.
- Privacy: You’ll also want to consider how visible your deck is to neighbors or passersby. If privacy is a concern, choose a location that’s shielded from view or plan for features like privacy screens or tall plants.
Defining the Purpose
Before you dive into the design, define how you plan to use your deck. This will significantly influence both the layout and features you incorporate:
- Entertaining: If your primary goal is hosting gatherings, consider including ample seating, perhaps built-in benches or even an outdoor kitchen. You might also want a larger space to accommodate multiple guests.
- Lounging: For a more relaxed setup, think about adding comfortable furniture like lounge chairs or hammocks. A smaller, cozy deck might suffice if it’s primarily for quiet reading or napping.
- Dining: If you envision outdoor meals, allocate space for a dining table and chairs. You may also want to consider a nearby grill or outdoor bar area to make dining al fresco more convenient.
Defining your deck’s purpose helps streamline the design process, ensuring it serves your needs and lifestyle.
Size and Layout
Once you know where the deck will be and how you plan to use it, it’s time to figure out the size and layout. The size should be proportional to the available space in your yard while also meeting your functional needs.
- Ideal Size: A common recommendation is to aim for a deck that’s large enough to accommodate furniture without feeling cramped. For instance, a small dining setup typically requires about 12×12 feet, while an area for lounging may need a slightly larger footprint.
- Flow and Access: Consider the flow of movement between areas on the deck. If you’re combining spaces for dining, lounging, and entertaining, make sure there’s enough room for people to move freely between them.
- Shape and Levels: Decks don’t have to be square or rectangular. Think about using different shapes or even multi-level designs to add visual interest and make the most of your yard’s contours.
Budget Considerations
Planning a deck also means planning your finances. A clear budget helps you decide on materials, design complexity, and size.
- Materials: The type of material you choose can significantly impact your overall cost. Pressure-treated wood is often the most affordable, but hardwoods, composites, and PVC offer added durability and aesthetics—albeit at a higher price.
- Size and Complexity: Naturally, a larger deck will require more materials and labor, increasing the cost. Additionally, intricate designs with multi-levels, built-in features like benches or planters, or custom railings can also drive up the price.
- Extras: Don’t forget to budget for extras like lighting, stain or paint, and any additional landscaping around the deck. These may seem like small details, but they can add up quickly.
To avoid budget surprises, always factor in a buffer for unforeseen expenses—typically around 10-15% of your total budget.
Tools You’ll Need
Building a deck requires a set of essential tools. While you can rent some of the more specialized ones, having the basics on hand is a must:
- Saws: Both a circular saw and a miter saw are invaluable for cutting deck boards and framing lumber to size.
- Drill: A power drill with the appropriate bits will help drive screws and fasteners efficiently.
- Level: Ensuring your deck is level and properly aligned is critical for stability and aesthetics.
- Measuring Tape and Carpenter’s Square: Accurate measurements are key to a professional-looking deck.
- Posthole Digger or Auger: If you’re building a deck that requires posts for support, you’ll need to dig holes for footings.
While this isn’t an exhaustive list, having these tools at your disposal will make the building process smoother.
By carefully considering the location, purpose, size, budget, and necessary tools, you’ll be well on your way to creating a deck that’s not only functional but also a beautiful extension of your home. Proper planning will save time, prevent costly mistakes, and ensure the finished deck meets your expectations for years to come.

Deck Design And Materials
Designing the perfect deck for your New Zealand home is an exciting yet detailed process. A well-crafted deck can enhance both the aesthetic appeal and functionality of your outdoor living space. Whether you’re aiming for a sleek modern design or a rustic retreat, there are several crucial aspects to consider. Let’s break down the essential elements of deck design and materials that will help you create a stunning and long-lasting deck for your home.
1. Design Inspiration: Tailoring Your Deck Style
New Zealand is known for its love of outdoor living, which makes deck design a key feature in many homes. There are a variety of popular deck styles to consider, ranging from simple rectangular shapes to more intricate multi-level or curved designs.
- Rectangular Decks: These are the most straightforward and cost-effective option, ideal for maximizing space in smaller yards or patios.
- Multi-level Decks: Great for homes with sloped landscapes, multi-level decks provide different zones for activities like dining or lounging.
- Curved Decks: For a more unique and modern aesthetic, curved decks can add a softer, organic look to your outdoor space, though they often require more expertise and materials to construct.
When selecting your deck design, consider the style of your home, the purpose of the deck, and how you envision using it. Will it be a spot for entertaining, a cozy corner to relax, or perhaps both?
2. Choosing Materials: Timber, Sustainability, and Durability
The materials you choose for your deck are just as important as its design. Each option offers different benefits in terms of durability, appearance, and environmental impact.
- Timber Options: In New Zealand, the most common decking materials include pine, hardwood, and composite. Each has its own set of advantages:
- Pine: Treated pine is an affordable and readily available option. It’s easy to work with but requires regular maintenance to protect it from rot and decay.
- Hardwood: Woods like Kwila or Vitex are more durable and provide a richer, more luxurious appearance. However, they are often more expensive and may need frequent oiling to maintain their color.
- Composite Decking: Made from a blend of wood fibers and recycled plastics, composite decking is low-maintenance and resistant to New Zealand’s humid and coastal weather conditions. While it’s pricier upfront, the long-term savings on maintenance make it a popular choice for homeowners seeking durability.
- Sustainability: More Kiwis are looking for eco-friendly decking materials. When choosing timber, it’s essential to consider whether it’s sourced from sustainable plantations. Look for FSC (Forest Stewardship Council) certification, which ensures responsible forest management practices. For a greener alternative, composite decking, made from recycled materials, is a great choice, minimizing the environmental footprint of your project.
- Decking Boards: Decking boards come in different widths, textures, and finishes, so it’s important to select boards that suit your needs in terms of durability, aesthetics, and budget. Wider boards can provide a more modern look, while narrow boards may work better in traditional designs. Consider whether you prefer smooth finishes or grooved boards that offer better slip resistance, especially in wetter climates.
3. Hardware and Fasteners: Ensuring Longevity in Harsh Conditions
One often overlooked aspect of deck building is the quality of hardware and fasteners. In New Zealand, where coastal conditions and humidity are common, using high-quality fasteners is crucial to ensuring your deck stands the test of time.
- Stainless Steel or Galvanized Fasteners: These are highly recommended due to their corrosion resistance. In coastal areas, salt air can quickly degrade standard screws, leading to structural instability over time. Stainless steel screws offer the best defense against rust, while galvanized screws are a cost-effective option for inland areas.
Investing in premium fasteners ensures the longevity and durability of your deck, preventing the need for frequent repairs or replacements.
4. Sketching Your Design: Blueprint Basics for Success
Before you break ground, it’s essential to sketch out your deck design or have a professional create a blueprint. Even a simple sketch can help you visualize the final result and identify potential issues early on. Here are some basic steps to follow:
- Dimensions: Measure the space where your deck will go, including length, width, and height if you’re planning a multi-level deck.
- Post Placement: Ensure your design accounts for adequate support by spacing posts properly. This is especially important for larger decks or those on uneven terrain.
- Joist Spans: The spacing between joists is crucial for the structural integrity of the deck. Depending on your material, this spacing will vary, but typically ranges between 400mm to 600mm.
Sketching out your deck design also helps you communicate your vision more clearly to builders or suppliers, ensuring everyone is on the same page.
Designing and building a deck for your New Zealand home is a rewarding project that can elevate your outdoor living experience. By drawing inspiration from popular styles, choosing the right materials, investing in high-quality hardware, and carefully planning your design, you’ll create a space that enhances your lifestyle while adding value to your home.
Keep in mind the local climate, sustainability considerations, and long-term maintenance when making decisions. With careful planning and attention to detail, your deck can become a stunning, functional extension of your living space that you’ll enjoy for years to come.

Obtaining Consent And Adhering To NZ Building Codes
Building a deck in New Zealand involves more than just picking out the right timber and getting your hands on the right tools. There are specific legal and regulatory requirements that homeowners must follow to ensure their deck is both safe and compliant with local standards. Here’s what you need to know:
Do You Need a Consent?
Before you begin building, it’s essential to determine whether your deck requires building consent. In New Zealand, the rules are clear: if your deck is higher than 1.5 meters above the ground, you must apply for building consent from your local council. This requirement exists to ensure that elevated structures are safe for use, particularly when it comes to preventing falls. If your deck is under 1.5 meters, you may not need consent, but you’ll still need to adhere to other building standards to guarantee structural integrity and safety.
Additionally, even if your deck is low to the ground, certain factors like proximity to property boundaries, soil conditions, and specific design choices may still trigger the need for consent. Always check with your local council to confirm whether consent is required for your specific project.
Compliance with Local Regulations
Whether or not you need consent, your deck must comply with New Zealand’s building regulations, which are set out in the New Zealand Building Code. Key areas of compliance include:
- Balustrade Height: For decks that are over 1 meter high, a balustrade (or railing) is required. The height of the balustrade should be at least 1 meter to prevent falls.
- Deck Height: As mentioned earlier, if your deck exceeds 1.5 meters in height, consent is mandatory. However, even decks under this threshold should be constructed with safety in mind.
- Proximity to Property Boundaries: There are rules about how close your deck can be to your property’s boundaries. Building too close without appropriate consent or consideration can lead to disputes with neighbors or enforcement action from the council.
These regulations are in place to protect homeowners, guests, and potential future occupants from accidents or unsafe building practices. Ignoring these standards can lead to hefty fines, costly modifications, or even the removal of your deck.
Engaging a Professional
For smaller, ground-level decks, you might feel confident taking on the project yourself. However, for elevated decks or more complex designs, it’s often wise to hire a professional. Architects, builders, or designers with experience in outdoor structures can help ensure your deck is both aesthetically pleasing and compliant with all relevant building codes.
Professionals can also be invaluable when it comes to navigating the building consent process. They can handle the paperwork, communicate with your local council, and make sure that every aspect of the design meets New Zealand’s rigorous standards. This is particularly important for high decks, multi-level decks, or if your project involves tricky terrain or unusual materials.
Resources
To help you get started on the right foot, here are some valuable resources:
- New Zealand Building Code: This is the foundation of all building projects in New Zealand and will help you understand the core requirements for structural safety, durability, and accessibility.
- Your Local Council’s Website: Each council in New Zealand may have slightly different interpretations or additional requirements, so it’s important to check with your local authority for specific guidelines or application forms.
- Licensed Building Practitioners: If you’re hiring a professional, make sure they are licensed under the LBP scheme, which ensures they meet national competency standards for building work.
By ensuring your deck project adheres to New Zealand’s building codes and regulations, you’re not only protecting your investment but also the safety of everyone who will use and enjoy your outdoor space for years to come. Always check the rules, and when in doubt, seek professional advice!

Preparing The Site
Before diving into the actual construction of your deck, it’s crucial to properly prepare the site. This ensures a solid foundation and helps avoid future issues such as uneven surfaces, poor drainage, or even structural instability. Below, we’ll walk you through the essential steps for getting your site ready for building a deck.
Clearing the Area
The first step in preparing your site is clearing the area where the deck will be built. This involves removing any obstacles that could interfere with the construction process, such as grass, rocks, roots, and debris. Here’s how to approach it:
1. Remove Vegetation: Begin by clearing any grass, weeds, or shrubs from the designated area. You can use a spade or a sod cutter to strip away the top layer of soil and grass. This step is essential because building directly over grass or plants can lead to shifting foundations and an unstable deck over time.
2. Get Rid of Debris: Next, eliminate rocks, twigs, and other debris. This ensures that the area is smooth and level, which is crucial for a stable deck foundation. Uneven surfaces can cause structural problems down the line, so taking time to clean the area properly is a critical part of the process.
3. Consider the Long-Term: If you’re working in an area prone to weeds or vegetation growth, consider using a landscaping fabric after clearing. This barrier will help prevent weeds from growing beneath your deck and causing damage later.
Marking Out the Deck Area
Once the site is cleared, it’s time to mark out the exact area where your deck will be constructed. This ensures that you build in the right location and gives you a clear visual of the deck’s footprint. Here’s how to do it:
1. Using Pegs and String: Start by driving pegs into the ground at each corner of your deck’s planned perimeter. These pegs serve as the outline for the deck’s boundaries. Once the pegs are in place, run a string tightly between them to form a rectangle or square. This string outline will act as a guide for laying out your foundation and ensure the dimensions are correct.
2. Double-Check Measurements: Measure the distances between each peg to verify that your deck’s layout is square and aligned with your plans. Ensuring accurate dimensions at this stage will save you headaches during the building process, as you’ll avoid uneven or misaligned deck boards.
Checking the Ground
After marking out the deck area, it’s crucial to assess the condition of the ground. A solid, level foundation is essential for the long-term stability of your deck. Here are some key considerations:
1. Leveling the Ground: Use a long, straight piece of lumber or a spirit level to check whether the ground within your marked area is even. If you find any low or high spots, you’ll need to either add or remove soil until the entire area is level. For minor leveling, a shovel and rake will usually do the job. For more substantial discrepancies, you may need to bring in extra soil or gravel to create a smooth surface.
2. Soil Considerations: Check the type of soil you’re working with, as this will affect your deck’s foundation. Clay soils can expand and contract with moisture, which could cause deck footings to shift. Sandy soils, on the other hand, may require additional stabilization to prevent sinking. If your soil is loose or unstable, consider adding compacted gravel or using foundation options designed for difficult ground conditions.
3. Adjust for Drainage: Proper drainage is crucial for maintaining the longevity of your deck and its foundation. If your site is prone to water accumulation, you may need to add a slight slope or install drainage solutions such as a French drain to direct water away from the deck’s foundation. Avoid building on ground that remains waterlogged after rain.
Foundation Options
The foundation is the most important part of your deck’s structural integrity. Depending on your needs and local conditions, you have a couple of foundation options to choose from.
Concrete Footings
Concrete footings are one of the most durable and reliable foundation options for decks, especially those elevated above ground level. Here’s what you need to know:
1. Why Concrete?: Concrete footings provide a solid, long-lasting base that anchors your deck to the ground, ensuring it remains stable and secure. They are particularly important for larger decks or those built on uneven ground.
2. How to Install?: First, dig holes where your deck’s support posts will go, ensuring they are deep enough to extend below the frost line (if you live in a cold climate) to prevent shifting during freeze-thaw cycles. The depth and width of your holes will depend on the size of your deck, but they generally range from 12 to 18 inches deep. Once the holes are dug, pour concrete into them and allow it to cure. After the concrete has set, your deck posts can be anchored directly into the footings.
Ground Anchors
For decks that are lower to the ground or in areas where digging footings is challenging, ground anchors offer a simpler alternative. These are ideal for decks that won’t be carrying heavy loads or for DIY projects where you want to avoid pouring concrete. Here’s how ground anchors work:
1. What Are Ground Anchors?: Ground anchors are metal stakes or screws driven into the ground to hold your deck’s support posts. They are typically used for decks that sit close to the ground, as they don’t provide as much stability as concrete footings for elevated structures.
2. When to Use Them: If your deck is low to the ground (within a few feet) and built on stable soil, ground anchors can be a quick and easy solution. They’re particularly useful for small decks, temporary structures, or in areas where excavating for concrete footings is impractical.
Proper site preparation is the foundation of any successful deck-building project. By carefully clearing the area, marking out your deck’s boundaries, leveling the ground, and choosing the right foundation option, you set the stage for a stable, long-lasting deck. Whether you opt for traditional concrete footings or choose the convenience of ground anchors, getting these preparatory steps right will save you time, money, and effort in the long run.

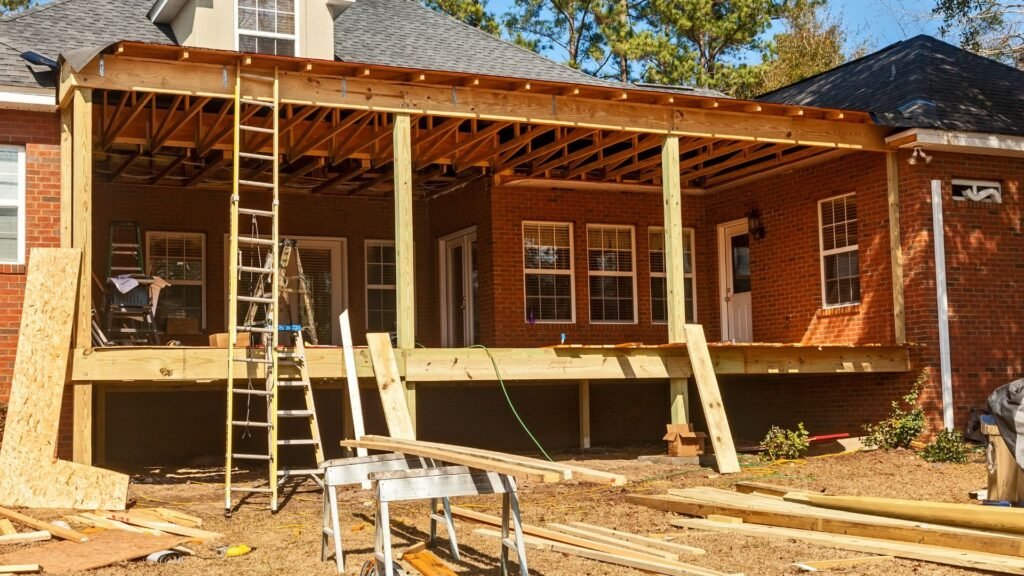
Building The Deck Frame
Constructing a sturdy and reliable deck begins with creating a strong foundation. The deck frame is the backbone of your structure, and getting this right ensures your deck remains safe, durable, and visually appealing for years to come. Here’s a detailed explanation of each step involved in building a deck frame.
Setting the Posts
Setting the posts properly is crucial, as they support the entire deck’s weight. This step involves the following:
1. Preparing Concrete Footings
Start by digging holes for the footings according to your deck’s design specifications. Typically, these holes are around 600-900mm deep, depending on the local building code and the load your deck will carry. Place a cardboard form tube in the hole, and fill it with concrete, leaving some space at the top for the post base.
2. Positioning the Posts
Once the concrete has partially set (but is still soft), insert the post brackets into the center of the footings, ensuring they are properly aligned. This ensures your posts will sit securely in place. Place your posts into these brackets and use temporary braces to keep them upright.
3. Measuring and Leveling the Posts
For the deck to be level, the posts must be accurately measured and cut to the correct height. Use a string line or a laser level to mark the height on all the posts. Carefully trim them to the exact height needed using a saw. Check that each post is plumb (perfectly vertical) using a spirit level, adjusting as needed before the concrete fully sets.
Attaching the Bearers and Joists
With your posts securely in place, it’s time to build the horizontal structure that will support the deck surface.
1. Measuring and Cutting Bearers
Bearers are the horizontal beams that rest on the posts and support the joists. Start by measuring the span between your posts to determine the length of the bearers. Cut the bearers to size, ensuring you leave room for any overhangs, if needed.
2. Securing the Bearers to the Posts
Attach the bearers to the posts using galvanized bolts or heavy-duty screws, which will prevent rust and add long-term strength. Ensure that the bearers are level as you attach them by using a spirit level. It’s important to double-check your measurements at this stage to avoid future complications.
3. Spacing and Installing Joists
Joists are installed perpendicular to the bearers and will form the main support system for the deck boards. Space the joists evenly according to your deck plan, usually between 400mm and 600mm apart. Secure the joists to the bearers using joist hangers, screws, or nails. Make sure the joists are all sitting level and aligned with each other to create an even deck surface.
Joist Hangers or Blocking for Extra Support
Joist hangers and blocking play a vital role in ensuring your deck’s structural integrity, especially in earthquake-prone regions like New Zealand.
1. Using Joist Hangers
Joist hangers provide extra support by connecting the joists securely to the bearers. They’re especially important in areas prone to natural movements, such as earthquakes, where additional stability is needed. These metal brackets ensure that your joists stay firmly attached even under stress.
2. Installing Blocking
Blocking involves placing small sections of timber between the joists. These not only strengthen the frame by preventing the joists from twisting or shifting but also add extra stability, which is essential for decks in seismic areas. For best results, place blocking at regular intervals along the joists, ensuring the structure remains rigid.
Ensuring Everything is Level and Square
Before moving forward, it’s critical to ensure the entire deck frame is perfectly level and square. This will make the following stages of construction smoother and result in a better finish.
1. Checking for Level
Use a long spirit level or laser level to check that the bearers and joists are all aligned horizontally. If the frame isn’t level, adjust the post heights slightly or shim the joists where needed until everything is perfect.
2. Ensuring Squareness
A square deck will not only look better but will also prevent future issues like uneven decking boards or improper railing installation. To check if your deck is square, measure diagonally from corner to corner. If both diagonal measurements are equal, your deck frame is square. If not, adjust the frame by pushing or pulling the corners until the diagonals match.
In conclusion, building a deck frame requires precision and careful attention to detail. By following these steps—setting the posts, attaching bearers and joists, using joist hangers or blocking, and ensuring everything is level and square—you’ll create a strong, durable foundation for your deck. Proper framing ensures the longevity of your deck and keeps it safe and sturdy, no matter the weather or natural conditions.

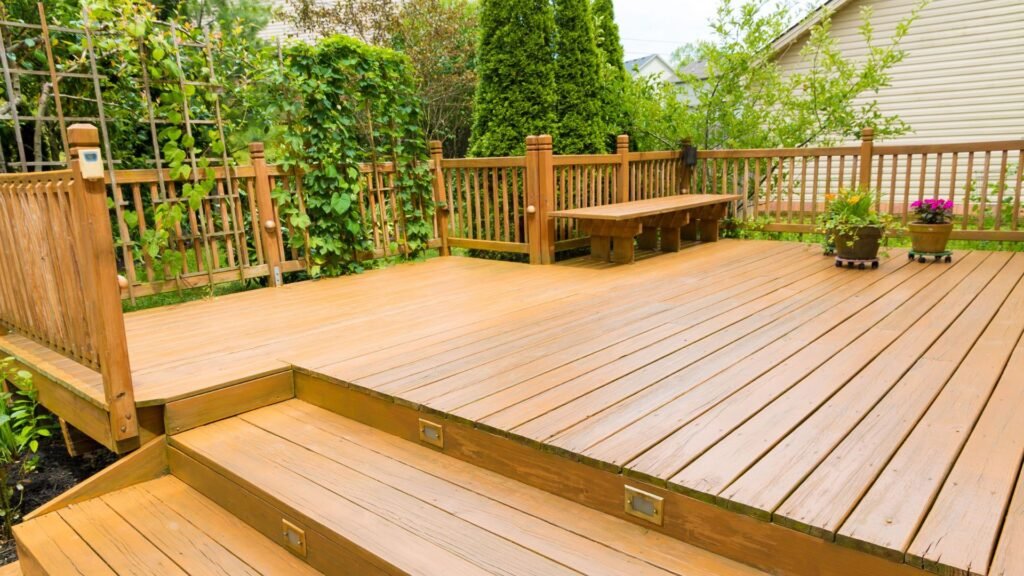
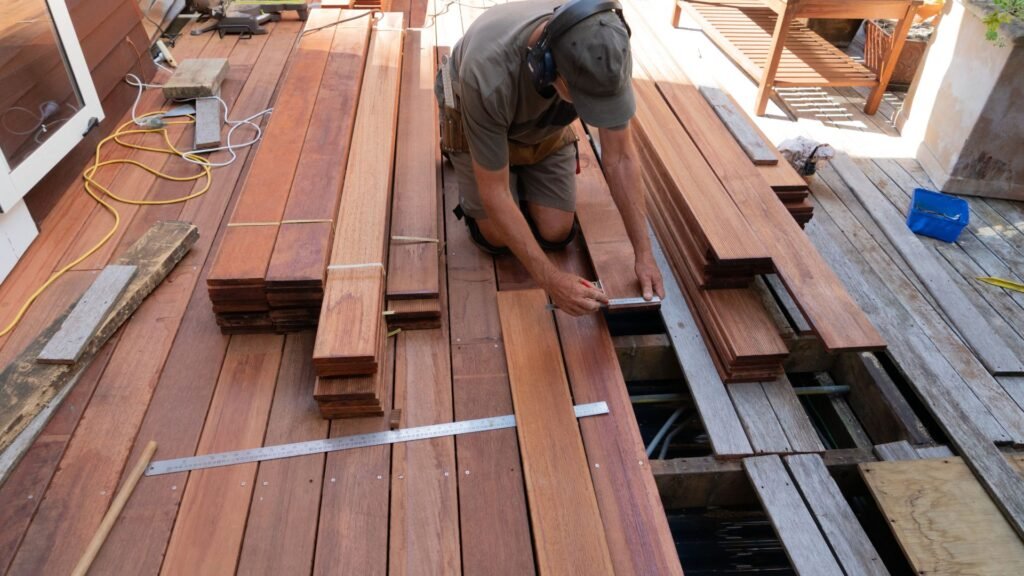
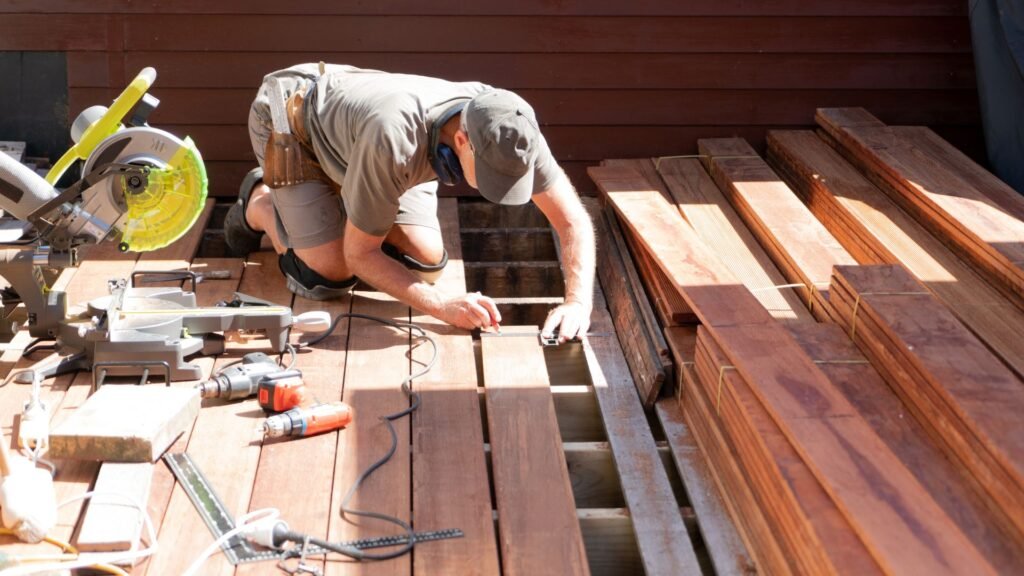
Laying The Decking Boards
Laying the decking boards is a crucial step that significantly impacts both the appearance and longevity of your deck. Proper installation ensures a sturdy, visually appealing, and durable deck that can withstand the elements. Here’s a detailed, step-by-step guide to help you lay decking boards like a pro.
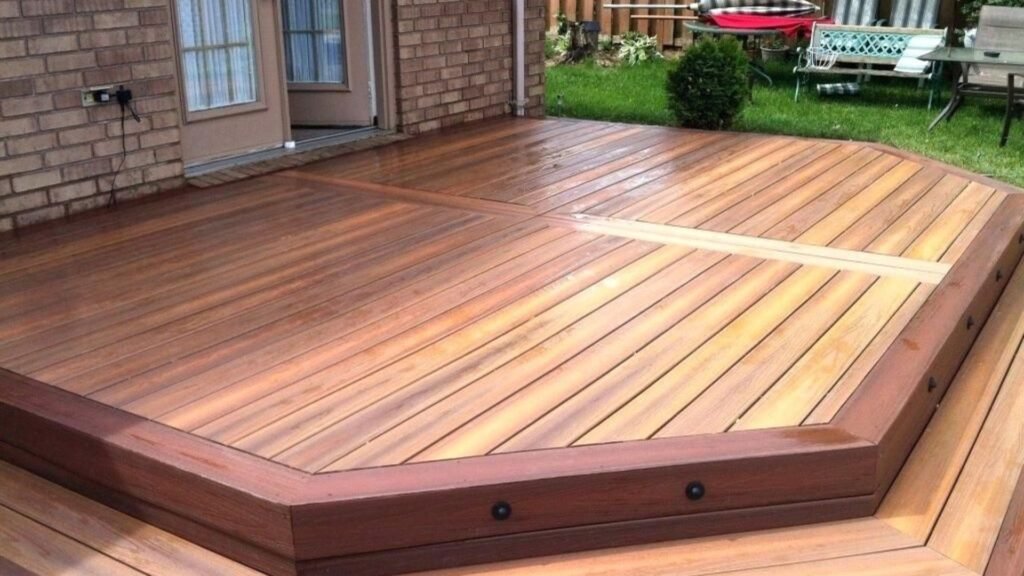
Choosing the Decking Pattern
Before you begin securing the boards, it’s essential to decide on the pattern you’ll use. This choice sets the tone for the deck’s overall aesthetic and can even affect the deck’s structural integrity.
- Straight Pattern: The simplest and most common way to lay decking boards is in a straight pattern, running parallel to the length of the deck. This method is both easy to install and highly functional. It also creates a clean, streamlined look.
- Diagonal Pattern: Laying boards diagonally across the deck adds visual interest and can make the space look more dynamic. This style requires more cutting and precision but offers a unique, eye-catching design.
- Herringbone Pattern: For a truly distinctive and elegant look, the herringbone pattern is an excellent choice. It requires a bit more skill to execute but adds a sophisticated flair that makes the deck stand out.
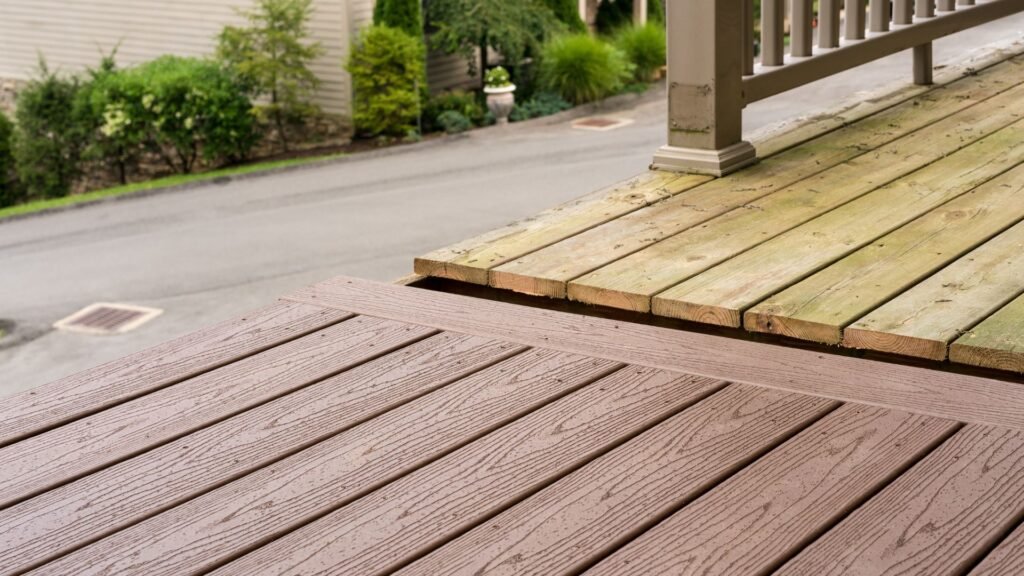
Spacing Between the Boards
Proper spacing between the decking boards is vital for the health and longevity of your deck. Without adequate gaps, water can accumulate, leading to wood rot and warping. Additionally, natural materials like wood expand and contract with changing weather conditions.
- Water Drainage: Leaving a small gap (typically around 1/8 to 1/4 inch) between each board allows rainwater to drain away easily, preventing moisture buildup. This is crucial for extending the life of your deck, especially in humid or rainy climates.
- Expansion and Contraction: Wood is a natural material that reacts to changes in temperature and humidity. By leaving space between boards, you account for this movement, reducing the risk of buckling or cracking.
Securing the Decking Boards
Once you’ve decided on a pattern and accounted for proper spacing, it’s time to secure the decking boards to the frame. There are various methods for fastening the boards, each with its pros and cons.
1. Traditional Fastening: The most common way to secure decking boards is by screwing or nailing them directly into the joists. When using screws, choose corrosion-resistant deck screws, which provide a stronger hold and prevent rust over time. Here’s a step-by-step process:
- Pre-drill holes: This helps prevent the wood from splitting when the screws are inserted.
- Drive the screws in: Place screws near the edges of each board, ensuring they are evenly spaced. Be careful not to overtighten, as this can damage the wood.
- Nailing option: While nailing is faster, screws offer a more secure attachment. If you choose to nail, make sure to use galvanized nails for long-term durability.
2. Hidden Fastening Systems: For a cleaner, more polished look, many people opt for hidden fastening systems. These systems attach the boards without any visible screws or nails on the surface, giving the deck a smooth, seamless appearance.
- Clips and brackets: Hidden fasteners typically involve using special clips or brackets that secure the boards from underneath or between the gaps.
- Benefits: Not only does this method enhance the deck’s appearance, but it also reduces the chances of surface splitting and extends the lifespan of the wood.
Dealing with Deck Edges
Finishing the deck edges is an important detail that adds a professional touch to your project. Clean, well-executed edges improve the deck’s overall appearance and ensure durability.
- Clean Cuts: When cutting the boards for the edges of the deck, ensure all cuts are clean and straight. Using a miter saw can help you achieve precise angles, especially if you’re working with patterns like herringbone or diagonal layouts.
- Edging Boards: Another way to create a neat finish is by installing edging boards. These are special boards that frame the outer edge of the deck, giving it a smooth, refined border. This technique also helps to protect the edges from wear and tear over time.
By following these steps and taking the time to plan carefully, you can lay your decking boards efficiently while ensuring a beautiful, durable result. Whether you choose a simple straight pattern or an intricate herringbone design, proper spacing, securing, and edge detailing will ensure your deck is both functional and visually appealing for years to come.
Adding Railings, Stairs, And Finishing Touches
When it comes to completing your deck, the final touches are just as important as the initial structure. These finishing elements not only improve the functionality and safety of your deck but also add to its aesthetic appeal. Here’s a comprehensive look at what’s involved in installing railings, building stairs, and adding other thoughtful details like lighting and seating.
Installing Railings: Prioritizing Safety and Design
Railings serve two key purposes: they ensure the safety of everyone who uses your deck, especially for elevated decks, and they add a decorative element that can elevate the overall look. For decks that are higher off the ground, it’s crucial to adhere to local safety regulations, ensuring that your railings are strong and durable enough to prevent falls.
In New Zealand, for example, the Building Code requires that decks over 1 meter high must have a compliant barrier or balustrade. This makes choosing the right materials essential. Many homeowners opt for wood or metal railings, but glass panels or cable railings have become popular options for a modern, sleek finish. Whichever material you choose, ensure that it complements the overall design of your home and deck.
Choosing the Right Balustrade Style: A Blend of Form and Function
Balustrades not only provide necessary support for railings but also significantly influence the overall aesthetic of your deck. There are several styles available, ranging from classic wooden balusters to more contemporary designs like glass or metal. Each material comes with its own benefits and drawbacks, so it’s important to select one that not only looks good but also meets your practical needs.
In New Zealand, balustrade designs need to comply with safety standards outlined in the Building Code. The spacing between balusters, for instance, must not exceed 100mm to prevent children from squeezing through. Glass balustrades provide an uninterrupted view and are an excellent option for homes with scenic surroundings, while wooden or metal balustrades offer a more traditional look.
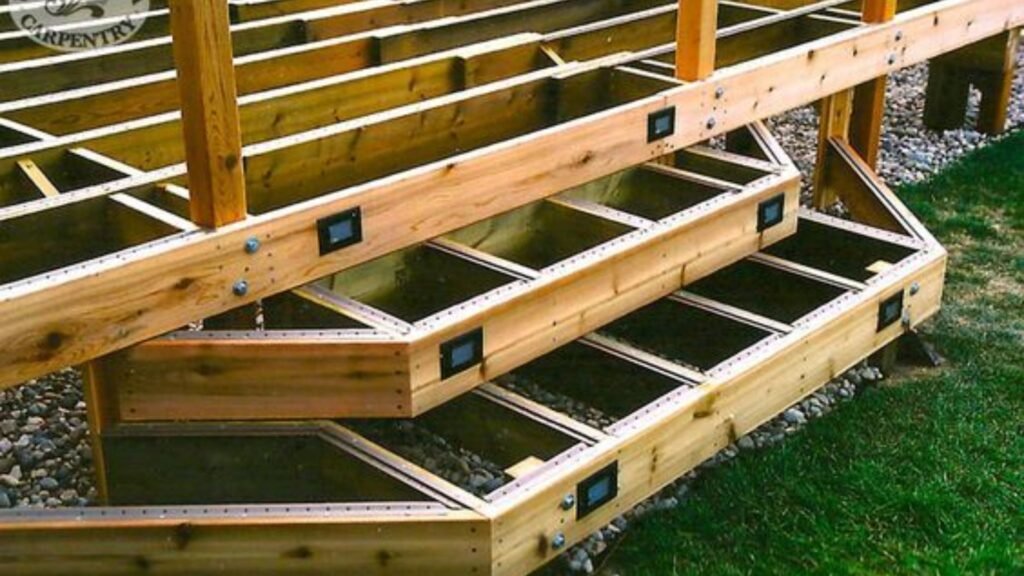
Building Stairs: Creating Safe and Sturdy Access
Adding stairs to your deck is an essential step if your deck is elevated. The design of your stairs should prioritize both safety and ease of access, ensuring they are comfortable to use. Stairs typically require a minimum tread width and depth to meet safety standards, and proper riser height is also essential to prevent trips and falls.
In designing your deck stairs, consider the type of wood or material that will provide the most durability. Many homeowners opt for pressure-treated wood, which is highly resistant to moisture and decay, but composite materials can offer long-lasting strength with minimal maintenance. A well-built stairway should feel sturdy, and you may also want to consider adding handrails, especially if your deck is high off the ground.
Lighting and Other Features: Enhancing Ambiance and Functionality
Finally, once the structural components like railings and stairs are in place, it’s time to add some finishing touches. Outdoor lighting is a fantastic way to enhance the ambiance of your deck while also improving safety, particularly around stairways and railings. Solar-powered deck lights are a popular eco-friendly option, while low-voltage lighting systems offer customizable brightness for different areas.
Built-in seating and planters can also transform your deck into a more functional space. Integrated seating, such as benches along the edges, maximizes space while offering comfortable areas for guests to sit. Planters add a natural touch and can be used to incorporate greenery into your outdoor living space, further blending the deck with your surrounding landscape.
In conclusion, when adding the final touches to your deck, it’s essential to focus on both form and function. Railings and balustrades provide necessary safety and support, while features like lighting, stairs, and built-in seating add to the usability and enjoyment of the space. By thoughtfully selecting materials and designs that adhere to safety standards and match your personal style, you can ensure that your deck is not only a safe outdoor area but also a visually appealing extension of your home.

Maintenance And Deck Care Tips
Proper deck maintenance is essential to preserving its beauty and ensuring its durability, especially in New Zealand, where the climate can be quite harsh on outdoor wood. Here’s a breakdown of the best practices for keeping your deck in prime condition year-round.
Regular Maintenance
Routine care is crucial for extending the life of your deck. Exposure to New Zealand’s weather—such as strong UV rays, heavy rain, and high humidity—can take a toll on untreated wood, causing fading, warping, and even structural damage over time. Regular cleaning is your first line of defense. By removing dirt, mildew, and debris, you prevent these elements from penetrating the wood and causing long-term damage.
Sealing and staining are other key steps in regular deck maintenance. Applying a high-quality sealant helps to create a protective barrier against moisture and UV radiation. Staining adds an extra layer of protection, enhancing the wood’s natural beauty while shielding it from the elements. It’s recommended to reapply sealant and stain every 1 to 3 years, depending on the exposure to sun and rain. This not only refreshes the appearance but also preserves the integrity of the wood.
Inspecting for Wear and Tear
Early detection of problems can save you time and money in the long run. Make a habit of inspecting your deck for signs of wear and tear, especially after periods of heavy use or harsh weather. Start by looking for loose or wobbly boards, which can be a tripping hazard and an indication of deeper structural issues. Tighten or replace any loose screws to ensure your deck remains safe and secure.
Next, check for rusted screws or fasteners, as these can weaken the deck’s structure and cause further damage. Replacing rusted hardware with stainless steel or coated alternatives will protect against future rusting. Also, inspect for signs of rot, particularly in areas that retain moisture, like the edges of the deck or around posts. Addressing rot early by replacing affected boards can prevent further deterioration and maintain the deck’s stability.
Best Practices for Longevity
If you want your deck to look as good as new for many years, following these best practices will ensure longevity. Start by cleaning your deck at least twice a year using a mild detergent or a specialized deck cleaner. Avoid using harsh chemicals that could strip the wood of its natural oils and protective treatments.
Refinishing is another important step. Over time, your deck will lose some of its color and luster due to exposure to the sun and rain. Refinishing every few years will restore its appearance and provide an additional layer of protection. Be sure to choose a stain or sealant that is specifically designed for New Zealand’s climate to withstand both UV exposure and moisture.
Lastly, consider investing in weatherproof treatments. These products are designed to repel water and resist mold growth, two major factors that contribute to the aging and deterioration of outdoor wood. By applying these treatments regularly, you can significantly extend the life of your deck while keeping it looking fresh and vibrant.
In summary, maintaining a deck in New Zealand’s varying climate requires regular attention. By cleaning, sealing, and inspecting it periodically, and using weatherproof treatments, you can enjoy your outdoor space for years to come while keeping it safe and attractive.

FAQs: About How To Build A Deck NZ
Do I need building consent to build a deck in New Zealand?
You generally need building consent if your deck will be more than 1.5 meters above the ground. For lower decks, consent is typically not required, but it’s always important to check with your local council to ensure compliance with local regulations.
What are the best materials for building a deck in New Zealand?
Popular materials for decking in NZ include treated pine, hardwoods like Kwila or Vitex, and composite decking. Pine is budget-friendly and widely available, while hardwoods and composite materials offer more durability and resistance to NZ’s weather conditions.
How do I choose the right location for my deck?
When selecting the location for your deck, consider sun exposure, views, privacy, and how the deck will connect to your home. You should also think about practical factors like drainage and the condition of the ground.
What tools do I need to build a deck?
Basic tools for building a deck include a saw, measuring tape, drill, hammer, level, post-hole digger, string line, and shovel. Depending on your deck’s complexity, you might also need concrete for footings and joist hangers for support.
How do I ensure my deck complies with NZ building regulations?
To ensure your deck complies with NZ building regulations, familiarize yourself with the New Zealand Building Code. This includes requirements for balustrades on elevated decks, post stability, and overall structural safety. Always check with your local council if you are unsure.
How much does it cost to build a deck in New Zealand?
The cost of building a deck in NZ varies depending on the size, materials, and complexity of the design. On average, you can expect to spend between $300 and $1,000 per square meter. Pine is more affordable, while hardwood and composite materials are more expensive.
How long does it take to build a deck?
For a medium-sized deck, the building process can take anywhere from one to three weeks, depending on factors like weather, the complexity of the design, and whether you’re working alone or with help. Larger or more complex decks may take longer.
What kind of maintenance does a deck need in New Zealand?
Decks in NZ require regular maintenance to withstand harsh outdoor conditions. This includes cleaning to remove dirt and debris, applying protective stains or sealants every few years, and inspecting for signs of rot or rust in screws and fasteners.
How do I ensure proper drainage for my deck?
Proper drainage is essential to avoid water damage. Ensure there’s a slight gap between decking boards (around 3-5 mm) to allow water to run off. You can also install a slight slope to direct water away from the house and use appropriate waterproofing treatments.
Can I build a deck myself, or should I hire a professional?
Building a deck yourself is feasible if you have some DIY experience and the right tools. However, for complex designs or elevated decks that require building consent, it’s advisable to hire a professional to ensure safety and compliance with NZ regulations.
Conclusion
Building a deck is an exciting and rewarding home improvement project that adds both beauty and functionality to your outdoor space. To ensure success, it’s important to follow key steps: planning your design, selecting the right materials, carefully constructing the deck, and performing regular maintenance to keep it in top condition. While the process may seem daunting, it’s a project that homeowners can take pride in completing. Whether you’re a seasoned DIYer or just starting, remember to consult local regulations and seek professional advice if needed. Ready to get started? We’d love to hear about your deck-building journey—feel free to share your progress or completed projects in the comments or on social media!
About the Author:
Mike Veail is a recognized digital marketing expert with over 6 years of experience in helping tradespeople and small businesses thrive online. A former quantity surveyor, Mike combines deep industry knowledge with hands-on expertise in SEO and Google Ads. His marketing strategies are tailored to the specific needs of the trades sector, helping businesses increase visibility and generate more leads through proven, ethical methods.
Mike has successfully partnered with numerous companies, establishing a track record of delivering measurable results. His work has been featured across various platforms that showcase his expertise in lead generation and online marketing for the trades sector.
Learn more about Mike's experience and services at https://theleadguy.online or follow him on social media: